Guides related to Beach
How to migrate a Neos site to Beach
This tutorial takes you through the steps for creating a project and instance on Beach and importing existing content of a Neos website.
Overview
This tutorial takes you through the steps for creating a project and instance on Beach and importing existing content of a Neos website.
You will need the following before starting with this tutorial:
- a Git repository containing a Neos distribution
- a working Composer setup (that is, you need to use Composer for package management and have composer.lock as part of your Git repo)
- a MySQL or MariaDB database export containing all tables of your Neos website
- assets (Flow resources) of your website stored in a local directory (usually in Data/Persistent/Resources)
- a computer which has SSH and the MySQL / MariaDB client installed
Prepare your project
Install flownative/google-cloudstorage
This step is mandatory if you want to be able to do anything with persistent resources (i.e. upload images or other assets). It's easy, though:
composer require flownative/google-cloudstorage
Now commit and push the changed composer.lock file and you are set. Unless configured, the package does not interfere with anything, so there is nothing to worry about. The needed configuration for Beach is explained later in this guide.
Create a project and instance
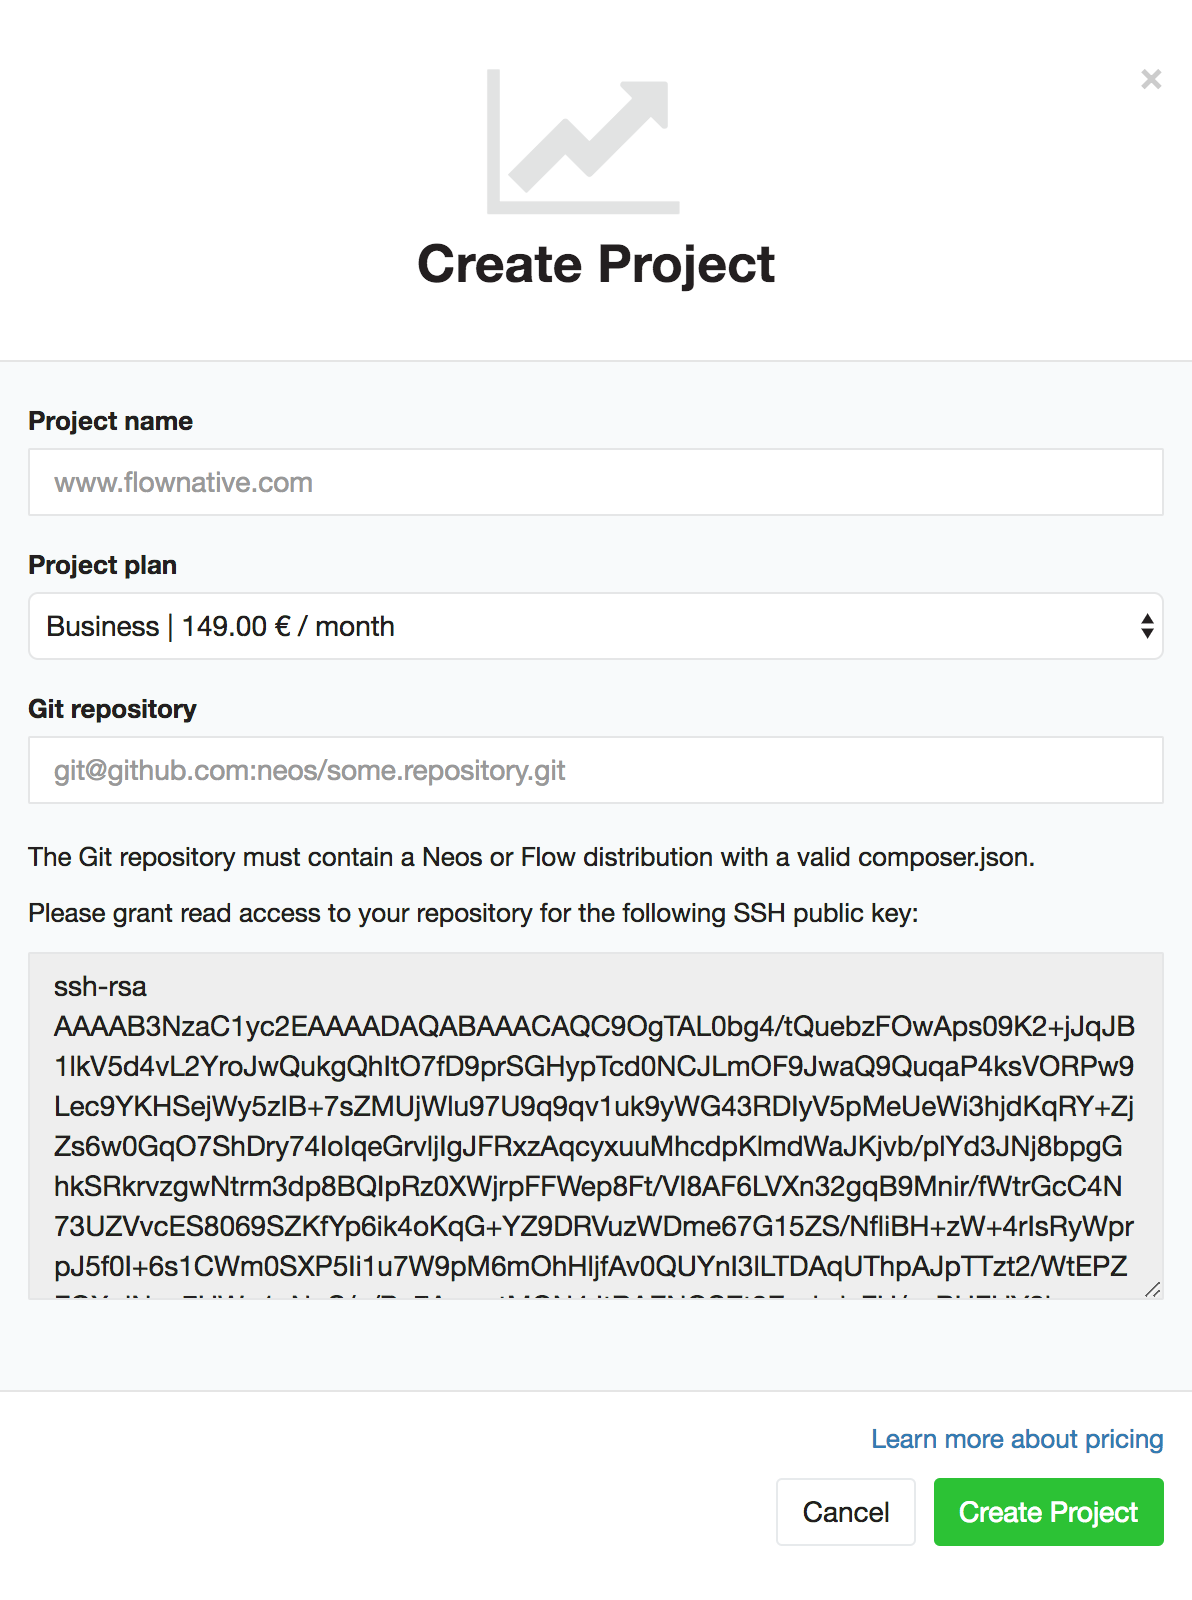
Log in to the Beach Control panel at https://beach.flownative.com and go to the "Projects" view of your organization. Click on "Create Project".
Next you need to specify a name for your project. Pick any name which makes it easy for you to recognize the project again. For many projects, the main domain name is a good choice.
Then enter the full URL of the Git repository containing your Neos or Flow distribution. The distribution must contain a composer.json and composer.lock file.
If your Git repository is non-public, you need to set the given SSH public key as a deployment key for your repository. Please also make sure that all other packages mentioned in your composer.json / composer.lock are either public or accessible with the given SSH key. Beach only needs read access to your repository.
When you created the project, go to the "Instances" tab and click the "New Instance" button. In the following dialog you need to specify the name of your new instance (something like "Production", "Staging Relaunch", ...), a fitting instance type and pick a branch of your Git repository which should be used.
After creating the instance you will end up a screen displaying details and actions for your new instance. Beach will automatically check for the latest commit and start building a Docker image for the latest code.
When the build is done, the "Deploy" button becomes active. Deploy your new instance for the first time.
The actual container deployment will be finished after a couple of seconds, but the instance needs some additional time to be started create the initial database structure (on each deployment "./flow doctrine:migrate" is called). It may take 1-2 minutes for the instance to be ready.
Import the database dump
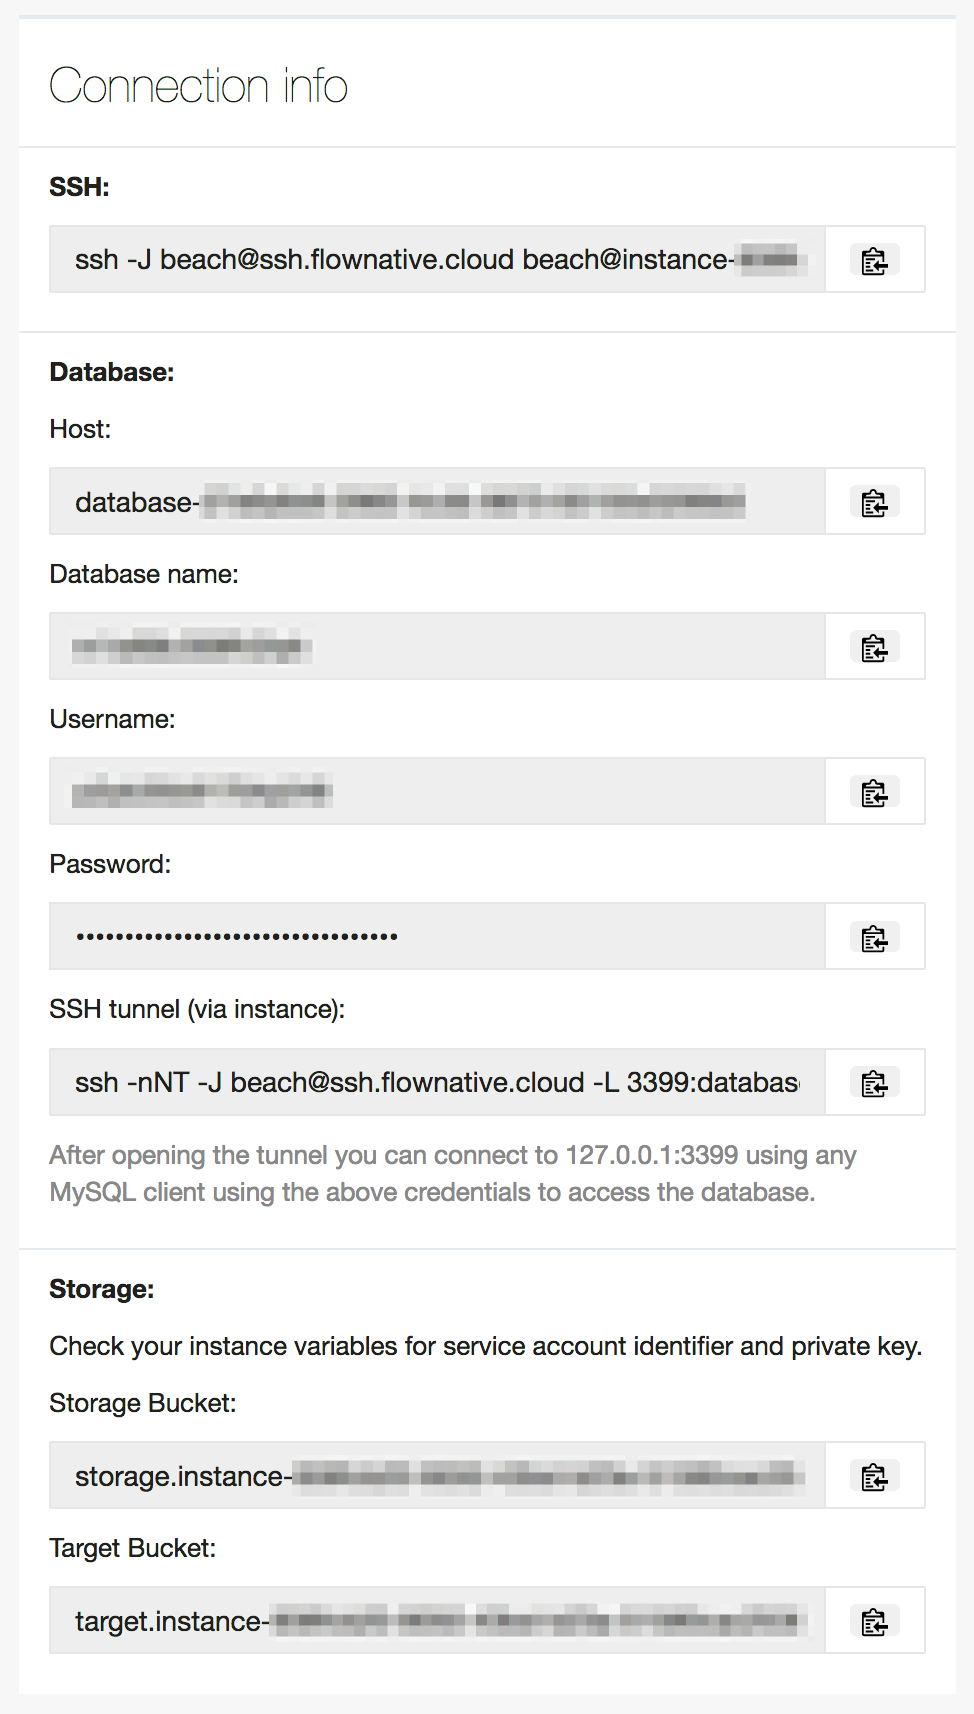
Using the connection info from your instance view try to log in to your new instance via SSH. If the connection times out, your instance might not be ready yet – just wait a little more and try again.
When you successfully logged in, you can log out again and proceed with importing the database content of your website.
In order to access the database server of your instance from your computer you need to create an SSH tunnel.
Open a terminal window and run the following SSH tunnel command, which can be copied ready-to-use from the connection info in the instance details:
ssh -nNT -J beach@ssh.flownative.cloud -L 3399:database-8f594285-bce3-4456-af2d-72cf83d56629:3306 beach@instance-156c4db-0125-457d-b6ce-218f6f9d1596.project-123abc45-def6-7890-abcd-1234567890ab
You can now try to connect to the remote database from your computer by running the following in a separate terminal window:
mysql --host=127.0.0.1 --port=3399 --user=pvy3sc2dirdxb9mk --password=1luZ58khlodKMQjTF8Q5AfAcNl6Q7zP --database=m2fmzatzm0rymc4v
Note that "localhost" would try to connect you to your local MySQL socket (if any) and ignore any port you specify. That's why it is important to specify "127.0.0.1" as the database host.
If you succeeded with connecting to your database, leave the interactive session by entering "quit" and pressing enter. Now you can import the SQL dump by running something like the following:
mysql --host=127.0.0.1 --port=3399 --user=pvy3sc2dirdxb9mk --password=1luZ58khlodKMQjTF8Q5AfAcNl6Q7zP --database=m2fmzatzm0rymc4v < my_neos_website.sql
Import the website assets
Your Beach instance is using Google Cloud Storage for storing and providing the persistent resources of the Neos site or Flow application. All the files in the Docker container of your Beach instance are temporary (ephemeral), there is no persistent file system attached to it. Even though that needs a little rethinking, that is actually a good thing: you can scale your instances up and down and start and stop them without having to think about how to attach a hard drive or shared file system.
Import assets using site import
The easiest way to import your assets is if they exist in your Neos site package (for example, if you are using the Neos Demo site or are currently working on a new website project). In that case, simply ssh into your instance and run a site import:
./flow site:import --package-key YourCompany.YourPackage
Import assets using Local Beach
If you have lots of assets or are migrating a website which is already in production, we recommend using Local Beach. Local Beach is a lightweight client application available for MacOS and Linux and can be installed in seconds.
The installation of Local Beach is explained in this guide.
Open a terminal and switch to the directory containing your Neos project (the one containing the composer.json of your Neos distribution). If you haven't used Local Beach with this project yet, run the following command to initialize it:
beach init
Import assets using Local Beach
Open a terminal and switch to the directory containing your Neos project (the one containing the composer.json of your Neos distribution). If you haven't used Local Beach with this project yet, just run "beach init".
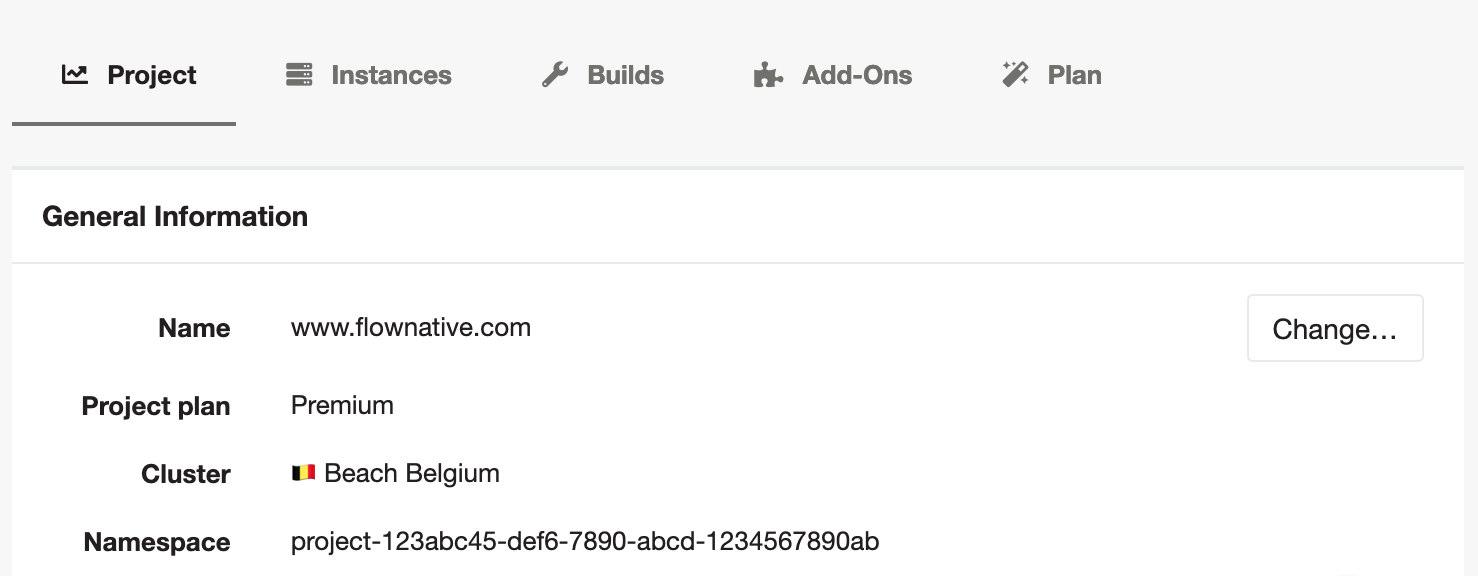
Next you need to determine the project namespace and the instance identifier of your Beach instance.
Log in to the Beach user interface and head over to the project's "General Information" tab. Your project namespace is either "beach" or something like "project-123abc45-def6-7890-abcd-1234567890ab".
You'll find the instance identifier in the details screen of your instance. It's an identifier like "instance-123abc45-def6-7890-abcd-1234567890ab".
Finally, go back to your terminal of your local Neos project and start the upload:
beach resource-upload --instance instance-123abc45-def6-7890-abcd-1234567890ab --namespace project-123abc45-def6-7890-abcd-1234567890ab
Moving caches to a persistent location
The filesystem of your Beach instances is not persistent and will be replaced with a fresh one on every deploy, this is obviously not great for caching and some caches should be put into a more permanent place.
We will use the database in our snippet below, if you have Redis available for your project you can also use that. We would not suggest using the database for the Neos_Fusion_Content cache for performance reasons.
Flow_Security_Cryptography_HashService: &pdoBackend
  backend: 'Neos\Cache\Backend\PdoBackend'
  backendOptions:
    dataSourceName: 'mysql:host=%env:BEACH_DATABASE_HOST%;dbname=%env:BEACH_DATABASE_NAME%'
    username: '%env:BEACH_DATABASE_USERNAME%'
    password: '%env:BEACH_DATABASE_PASSWORD%'
    defaultLifetime: 0

Flow_Session_Storage: *pdoBackend
Flow_Session_MetaData: *pdoBackend
Final steps
Uploaded all the content and assets? Then it's time to publish resources and see if everything is working.
Publish resources
Log in to your instance via SSH using the "ssh -J ..." command shown in your connection info tab. Once you're in your instance shell, publish all the resources:
./flow resource:publish
If that worked out without any unexpected errors, head over to your instance's public URL and see if your website comes up.
Final words
That sounded like an awful lot of steps and rocket science? We got you. Of course we don't want you to get lost in tunnels and spend your day copy & pasting commands into a shell. That's why we're working on a nice Beach command line tool which will do all the heavy-lifting for you.
And if something didn't work out like you expected, we're all ears: just get in touch with us via our chat or send us an email.
Further improvements
Install VIPS support
This can speed up image manipulation. If you like to do this, head over to our guide on using VIPS with Neos.
Use Redis for caching
Redis is a very fast key/value store that can provide speed improvements with caching, especially for caches where tagging is used heavily. Configure it following our guide on using Redis with Neos and Flow.